Materials
The materials panel lets you create and setup a Blender material for the terrain using a simple UI made for terrains. It can work with both Cycles and Eevee, but it’s designed for Cycles using micropoly displacement.
The materials system follows the familiar layers system from Gimp or Krita. Since terrains usually have many different materials in them (rocks, ground, grass, water, etc.), layers are used to represent those different materials. Layers are overlaid one over the other from the bottom to the top. Each layer has its own settings, name and visibility. They can be added, deleted and moved around.
Materials settings are stored in the terrain objects, so you can come back and tweak them later.

Layer Types
Layers have a specific type that determines which nodegroup they use and what they are for. The current version comes with 5 layer types.
Color
A simple color. Useful for troubleshooting.

- Color
The color to use for the material
- Roughness
Roughness for the glossy reflections
Ground
A selection of builtin textures for the ground. Grass, Mud, Rocks, etc.

- Texture
Image to use as texture (from the builtin texture collection). You can find these files by clicking the “open textures folder” button in the options subpanel
- Displacement
Amount of displacement to use with the texture
- Scale
Scale of the texture. Higher is smaller and with more repetition
Water
A material simulating water.
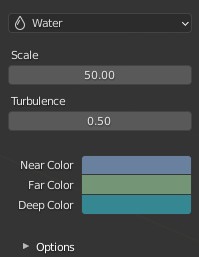
- Scale
Amount of waves/ripples
- Turbulence
Intensity of the waves
- Near Color
Color for water near the camera (this will be blended with the far color)
- Far Color
Color for the water that is farther away from the camera
- Deep Color
Color for the deeper parts of the water
Snow
A basic snow material. There are no options at the moment.
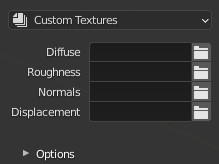
Custom Textures
Just like the Ground type, but you can pick the texture files.
Mask

In this tab you can select the min/max slope and height where the layer is shown
Under the hood
Terrain materials are regular Eevee/Cycles materials. Mirage adds, remove and modifies nodegroups automatically based on the settings in the ui.
You can find nodegroups named after the layers index, they will have a label that corresponds to the layer’s name.
A good rule of thumb for editing the nodegroups is that you can change any value and add as many nodes as you want, but deleting anything will probably break the UI since it expects certain nodes to be there.
There are two more nodegroups used inside the layers:

Untiler: Prevent visible tiling when repeating a texture many times. This is based on Poliigon’s untiler (from Youtube)
Mask: The slope and height mask for that layer
Options Subpanel
The options subpanel comes with some utilities.
Open textures folder: Open the built-in textures folder in your file manager. Useful if you need to access the actual files for any reason.
Setup Cycles: Setup micropoly displacement settings when the render engine is Cycles.